groundhawg
Full Access Member
I am not done with this write up, I do want to get it posted up just incase someone else has the same problem as I did, I would hope that the job would go much easier since I got home schooled on this one...As soon as my pic hosting site allows, I will add some pics and delete this narrative.
MOVING ON TO THE GRAVY....
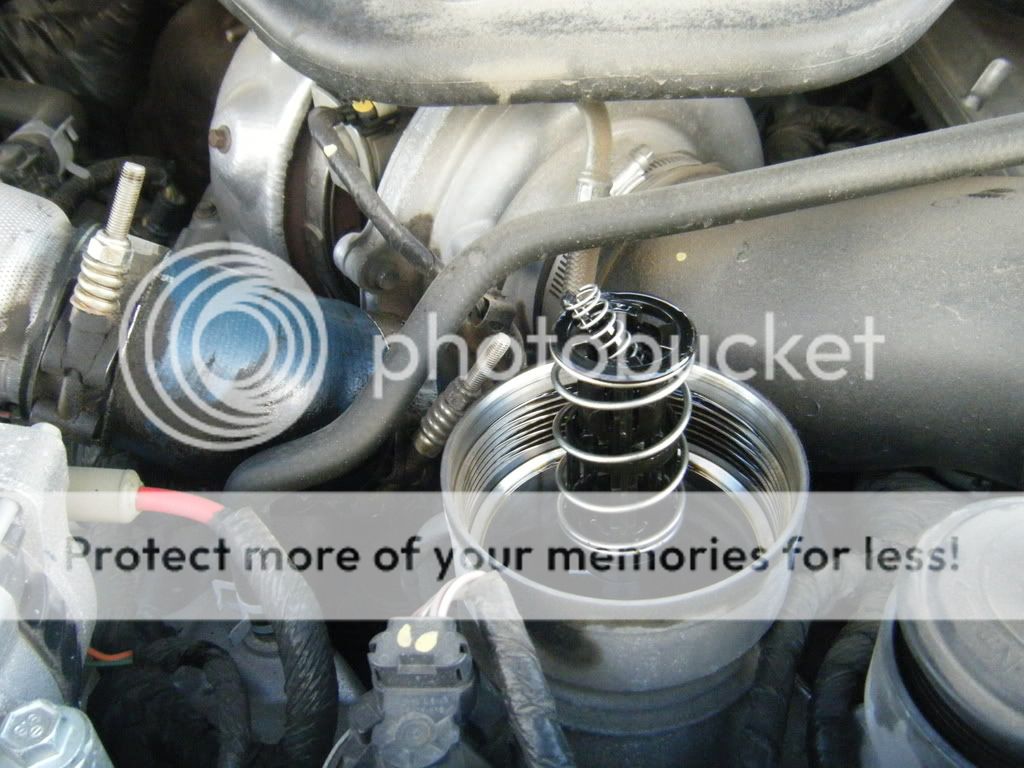
I changed the oil on my 6.0l yesterday, thinking it would be the same job that it has every other time...WRONG ANSWER! As I pulled the filter and cap up from the housing, I noticed something odd on the oil return tube...the plastic thing with the spring wrapped around it that goes in the middle of the filter cartridge...It was a smaller spring with some black plastic in it.
It was at that point that panic started to set in. I quickly went inside the house and started looking through all of my saved on-line diesel haunts trying to find the answer...unfortunatly, there isn't much info about it. I did however find the Ford part number 3c3Z-6C755-AA and got a new assembly on the way. The new part looks easy enough to install, as it should be, but Ford does not include any instructions so that you don't make this worse than it should be...and it is easy to do just that.
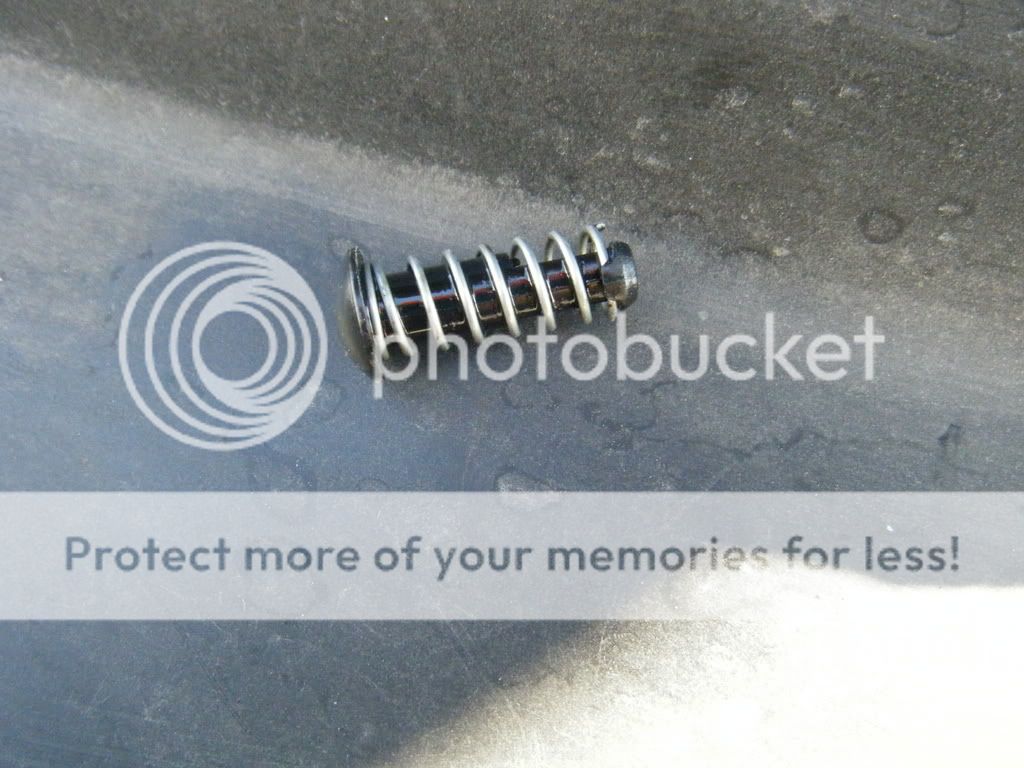
OK, so now that you have the new part, you will see that the bag includes the oil tube, one gasket, and one cap head screw. The screw is a Torx drive...and Torx head anythings suck. I was able to use a fairly worn and twisted T25, although I did end up welding part of a 9/64 allen wrench to be sure everything was snug before installing the filter.
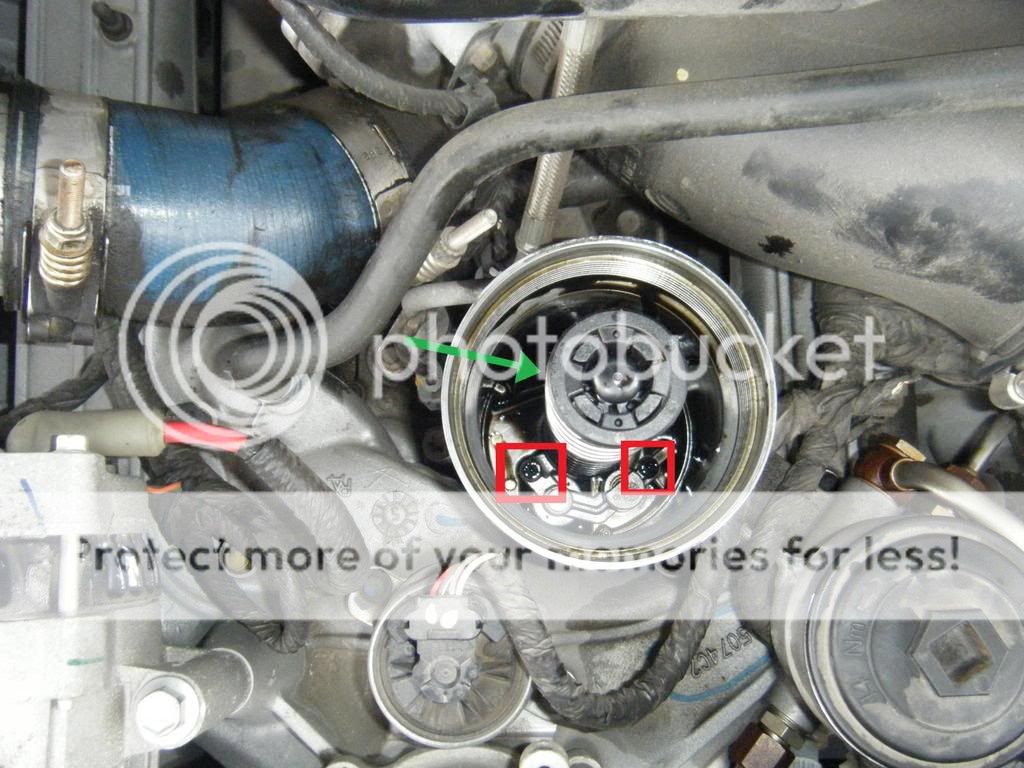
Looking down into the filter housing, you will see three of the same bolts that are included with the new oil tube...two in the front and one hiding directly behind the tube. You need to have some sort of magnet or claw tool handy to get in there too, as there is no room for you to get your hands into the housing. So, remove the bolt that is toward the rear of the truck. DO NOT REMOVEthe two bolts toward the front...only loosen them up four or five rounds. If you did not remove the front two bolts, skip past the italicized print...you are almost finished.
If you do remove the front two, you will have a small valve and a spring try to take off on you...go ahead, ask me how I know. At anyrate, if you did get to this point on the truck and are now trying to figure out what to do as I did, it's still not that bad. The small metal block has a spot for two valves, and one will not come out. There will also be a spring that goes in with the valve. Place the valve, cupped side up, over it's port in the floor of the filter housing. Next place the spring inside the valve. Next, get the metal part to line up with both the spring and valve, the port for the other valve, and the bolt holes. Now you can start the bolts, but do not tighten them yet.
Now, with the front two loose and the rear bolt removed, give the old oil tube a bit of a turn and it will come right out from under the ears of the metal peice. Install the new tube in its place...make sure the old washer that goes between the oil tube and the housing is not in the way. Oil the new seal and place it in the groove. Install the oil tube carefully. After this, you will need to become creative on how to get the rear bolt through the hold down. I used one of the small flexi-stem claw tool to start it in the hole. Then, simply snug the three bolts down and you are once again ready until the next time.
MOVING ON TO THE GRAVY....
I changed the oil on my 6.0l yesterday, thinking it would be the same job that it has every other time...WRONG ANSWER! As I pulled the filter and cap up from the housing, I noticed something odd on the oil return tube...the plastic thing with the spring wrapped around it that goes in the middle of the filter cartridge...It was a smaller spring with some black plastic in it.
It was at that point that panic started to set in. I quickly went inside the house and started looking through all of my saved on-line diesel haunts trying to find the answer...unfortunatly, there isn't much info about it. I did however find the Ford part number 3c3Z-6C755-AA and got a new assembly on the way. The new part looks easy enough to install, as it should be, but Ford does not include any instructions so that you don't make this worse than it should be...and it is easy to do just that.
OK, so now that you have the new part, you will see that the bag includes the oil tube, one gasket, and one cap head screw. The screw is a Torx drive...and Torx head anythings suck. I was able to use a fairly worn and twisted T25, although I did end up welding part of a 9/64 allen wrench to be sure everything was snug before installing the filter.
Looking down into the filter housing, you will see three of the same bolts that are included with the new oil tube...two in the front and one hiding directly behind the tube. You need to have some sort of magnet or claw tool handy to get in there too, as there is no room for you to get your hands into the housing. So, remove the bolt that is toward the rear of the truck. DO NOT REMOVEthe two bolts toward the front...only loosen them up four or five rounds. If you did not remove the front two bolts, skip past the italicized print...you are almost finished.
If you do remove the front two, you will have a small valve and a spring try to take off on you...go ahead, ask me how I know.
At anyrate, if you did get to this point on the truck and are now trying to figure out what to do as I did, it's still not that bad. The small metal block has a spot for two valves, and one will not come out. There will also be a spring that goes in with the valve. Place the valve, cupped side up, over it's port in the floor of the filter housing. Next place the spring inside the valve. Next, get the metal part to line up with both the spring and valve, the port for the other valve, and the bolt holes. Now you can start the bolts, but do not tighten them yet.Now, with the front two loose and the rear bolt removed, give the old oil tube a bit of a turn and it will come right out from under the ears of the metal peice. Install the new tube in its place...make sure the old washer that goes between the oil tube and the housing is not in the way. Oil the new seal and place it in the groove. Install the oil tube carefully. After this, you will need to become creative on how to get the rear bolt through the hold down. I used one of the small flexi-stem claw tool to start it in the hole. Then, simply snug the three bolts down and you are once again ready until the next time.
Last edited: